Hey everyone, welcome back to our Flutter tutorial series. Today, we’re diving into an exciting project: Music / Podcast Streaming Service App using the Ultimate Flutter UI Kit. But before we get into the coding, let’s explore the amazing features this UI Kit has to offer.
The Ultimate Flutter UI Kit is an exceptional resource to kick-start your Flutter project development. Our team has meticulously crafted this UI kit, complete with comprehensive documentation and a user-friendly coding structure that’s easy to grasp. With this kit, you’ll have access to a wide range of tools and features that will enable you to create stunning user interfaces for your app. Whether you’re an experienced developer or just starting out, the Ultimate Flutter UI Kit is the perfect solution for your needs.
There are three components in the Ultimate Flutter UI Kit, namely:
- Full Apps UI Kit, where you will receive dozens of UI kit as a complete application. You can extract this UI Kit and use it directly as a kick-starter for your project.
- Hundred of reusable Custom Widgets, which are a collection of custom widgets, parts of an application, such as headers, sliders, lists, and so on.
- Dozens of screens collection, for example, sign-in screen, notification screen, profile screen, and so on.
Exploring Nada – Features Overview
One of the Flutter UI Kit you can find in Ultimate Flutter UI Kit is Nada, a Music / Podcast Streaming Service App UI kit. Nada is a Flutter UI Kit that can be used as a starting point to build a music streaming service that provides users with access to a vast library of songs, podcasts, and other audio content.
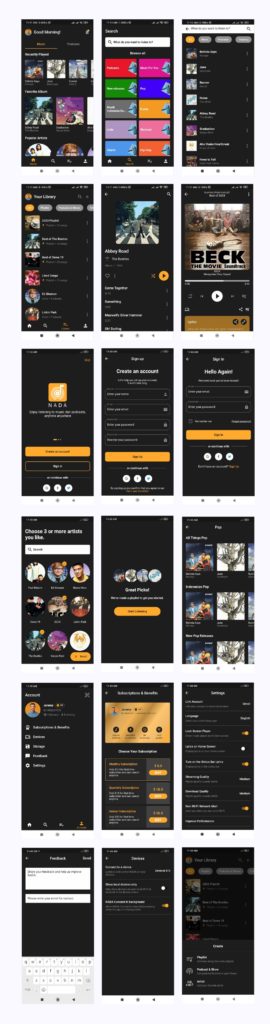
Below are the features you can find in an Nada:
- Onboarding screen: The initial pages users encounter in a new app, introducing key features and guiding setup. It highlights functionalities, facilitates account creation and login.
- Sign-up screen: A screen where users provide information, such as name and email, to create an account. It also contains social media login integration that enables users to create accounts swiftly by connecting their social media profiles. It facilitates account creation, allowing users access to personalized features and services while ensuring a secure and user-friendly experience.
- Sign-in screen: A user interface where individuals enter their credentials, such as email and password, to access their existing accounts. Additionally, social media login integration allows users to sign in seamlessly by connecting their social media profiles.
- A preference screen for selecting artists or shows allows users to customize their music experience. On this screen, users can choose and follow their favorite artists and shows, influencing personalized recommendations and curated playlists. This feature enhances the app’s ability to tailor content to individual tastes, providing a more engaging and enjoyable listening experience.
- Home Screen: The home screen is the default landing page when you open the Nada app. It features personalized recommendations, including playlists like ‘Recently Played’, ‘Favorite Album’, ‘Popular Artists’ and so on. You may also put recommendations based on users listening habits, recent activity, and new releases. The Home Screen incorporates a tab bar view, effectively segregating Music and Podcasts for a more organized user experience.
- Search and Recommendations: The app offers a search feature to quickly find specific titles. It also provides personalized recommendations based on the user’s viewing history and preferences.
- Your Library: This section contains all user saved music, playlists, podcasts, and albums. You can organize your content by playlists, artists, albums, and podcasts. The ‘Liked Songs’ playlist, which includes all the songs you’ve liked, is often prominently featured.
- Profile: The profile screen displays user’s account profile, including user’s subscriptions, devices setting, storage settings, giving feedback. Users can access the settings screen, which allows users to customize their app experience, including account settings, playback preferences, and notifications.
- Now Playing: The now playing screen shows the currently playing song. Users can control playback, access additional options like repeat and shuffle, and view the album artwork.
- And another screen, 25 of totals.
Extracting Music / Podcast Streaming Service App from Ultimate Flutter UI Kit
Now, let’s move on to extracting the Music / Podcast Streaming Service App from the Ultimate Flutter UI Kit. Follow these steps to integrate it into your Flutter project.
- Extract the file that you have downloaded from CodeCanyon, you will find 2 files, the first is the documentation file, and the second is the zip file called flutter_ultimate_ui_kit-master, then extract this file too.
- Open your favorite IDE, in this case I am using Visual Studio Code. Create a new Flutter project, by opening the Command Palette (Ctrl+Shift+P), then selecting Flutter: New Project > Application, Select the Folder where your project will be created, then specify your Application Name
- Wait until the project has been created, you will get a fresh new Flutter project.
- Now go back to the flutter_ultimate_ui_kit-master folder. Locate the folder /lib/fullapps/nada, inside it, you can find:
- The /data_models folder, where all model data for the Nada application is stored.
- The /screens folder, where all the dart code for the screens is stored
- The /widgets folder, where all the dart code for the widgets is stored
- The constant.dart file contains color scheme settings.
- The theme.dart file contains theme settings for the application.
- The main.txt file, this file will replace the main.dart file from your application.
- Copy and paste all the folders and files above into your project’s /lib folder.
- Then open the main.txt file and copy and paste its contents into your project’s main.dart file, replacing the original content.
- Create /assets folder in the root of your project, then copy the /assets/nada from /flutter_ultimate_ui_kit-master and paste under it, so that you get the asset folder arrangement as below.
- Copy /fonts folder with all of its content from flutter_ultimate_ui_kit-master into the root of your new project.
- Now it’s time to add the assets and fonts paths to the pubspec.yaml file. Open your project’s pubspec.yaml file and add the path as shown below:
assets:

- assets/nada/
- Next, add the font path to pubspec.yaml, copy and paste the code below:
 fonts:

    - family: Poppins

      fonts:

        - asset: fonts/Poppins/Poppins-Regular.ttf

        - asset: fonts/Poppins/Poppins-Medium.ttf

        - asset: fonts/Poppins/Poppins-SemiBold.ttf

        - asset: fonts/Poppins/Poppins-Bold.ttf

weight: 700- Pay attention to the indentation, as a writing reference, it’s easier for you to copy directly from the pubspec.yaml file of /flutter_ultimate_ui_kit-master.
- Next, go back to your project’s /lib folder. It’s possible that one or more dart files have errors like the example below, this error is related to dependencies. To fix this, open the files and easily solve it using Quick Fix.
- In this case, there are errors in social_button.dart. Please open the file, then access the Quick Fix prompt by placing the cursor on the part where the error occurs, then press (Ctr+ .) and select Add ‘flutter_svg’ to dependencies. Wait until the process of adding dependencies is complete.
- After all dependency errors are resolved, now is the time to debug your project by pressing the F5 key. Next, you can start customizing the project you just created.
Customizing the Music / Podcast Streaming Service App
Now comes the exciting part – customizing your Music / Podcast Streaming Service App using the Ultimate Flutter UI Kit. Let’s explore how you can personalize the color scheme, theme, and fonts.
Customizing the Color Scheme
If you’re looking to switch up the color scheme of your app, there’s an easy way to do it. Simply navigate to the /lib/constants.dart file and adjust the constant value associated with the desired color. This will allow you to modify all elements in your app that utilize that particular color, making for a quick and seamless transition. Whether you’re aiming for a bold new look or simply want to freshen things up, this method provides a simple solution for updating your app’s aesthetic.
Customizing the Theme
If you want to switch up the look and feel of your application, one way to do so is by accessing the /lib/theme.dart file. Once you’re there, you’ll be able to tweak a variety of elements that make up your app’s default theme. For instance, you can adjust the background color of the Scaffold (the base layer for your app), change the font size to better suit your preferences, or even modify the color and style of the AppBar (the bar at the top of your screen). Other details that are fair game for customization include icon size and color, among others. By taking advantage of all these options, you can create a unique experience that truly reflects your vision for your application.
Customizing the Font
The Ultimate Flutter UI Kit provides the option to use custom fonts into your Flutter-project. Here are the detail steps:
- Upload your custom font into the /fonts folder.
- Define your new font in pubscpec.yaml.
- Open the /lib/theme.dart file, then change fontFamily of ThemeData to “Muli”
Conclusion
And there you have it! In this article, we explored the fantastic features of nada and learned how to extract and customize a Music / Podcast Streaming Service App using the Ultimate Flutter UI Kit, purchase link in description box. Don’t forget to share this post, subscribe for more Flutter content. Happy coding, and see you in the next one!